


Photo by Aaron Burden on Unsplash
Building A Rest Blogging Api With Nodejs/express
A step-by-step approach to building a blog


Table of contents
Introduction
What are APIs and how do they work?
Anyone who works with business software has heard terms like “API” and “webhooks” thrown around. In this article, we’ll not only cover what APIs are, but we’ll also answer the question: “How do APIs work?” Understanding the function of APIs is the key to understanding how they can help business users in any role accomplish more, faster - without necessarily having to learn to code.
API tools have fundamentally transformed how developers write applications. They have introduced an entirely new vertical of “platform as a service” software companies. API-based tools are the reason why data integrations between essential business software are possible. API integrations have become essential to operations and revenue professionals.

API
API stands for “application programming interface.” An API is essentially a set of rules that dictate how two machines talk to each other. Some examples of API-based interactions include a cloud application communicating with a server, servers pinging each other, or applications interacting with an operating system.Whenever you use an app on your phone or computer or log onto Twitter or Facebook, you’re interacting with several different APIs behind the scenes. Nearly all businesses that use any kind of modern technology use APIs at some level to retrieve data or interact with a database for customers to use.
An API’s defined communication protocol is what enables developers to build, connect, and integrate applications quickly and at scale. Consider, as an example, Jeff Bezos' famously-issued 2002 mandate. Amazon's change of direction shows how APIs helped it move faster than its competitors, and is reportedly the reason Amazon is so successful. Bezos ordered all of his teams to communicate and expose data and functionality through service interfaces, that is, APIs. Once the APIs and infrastructure were in place, Amazon’s teams were able to operate much more efficiently. Launching this new infrastructure enabled the creation of Amazon Web Services, which has since become Amazon’s largest revenue driver.

Amazon’s decision to move to service interfaces enabled the launch of AWS
Some businesses don't just employ internal APIs, which their engineers use to build features for their consumers. Many companies also use external APIs, which the developer community uses to launch products. Some examples include Twilio (communications API), Stripe (payments API), and Sendgrid (email API), which offer a “Platform as a Service” (PaaS) model. Such companies enable developers to build applications on their platform, which might perform functions such as hosting web servers or communication applications. There are businesses whose main value comes from connecting different APIs and web services, which are categorized as “Integration Platform as a Service.” IPaaS companies let users connect disparate web services and tools, most notably to route data or automate workflows. Both of these verticals have grown tremendously, fueled by the extensibility and ease of use of APIs.
APIs have played a critical role in shaping modern business by enabling automation. But how do APIs work? And more importantly, how can you use them to connect the services that you rely on to route data or automate critical workflows?
How do APIs work? And how do they help you do more.
An application programming interface is a set of rules that define how computers, applications, or machines can talk to each other. You can think of it this way: the typical user interface is intended for use by a human being, while APIs are intended for use by an application or computer.

Most web APIs sit between the application and the web server. The user initiates an API call that tells the application to do something, then the application will use an API to ask the web server to do something. The API is the middleman between the application and the web server, and the API call is the request. And every time you use software to communicate with other software or online web servers, you’re using APIs to request the information you need.
It’s important to note that while web APIs are the most common, APIs aren’t limited to the web. There are APIs for virtually every machine or system that expects to interact with other machines or systems.
How do APIs work? An abstraction
Let’s use a metaphor to explain how an API works.
Imagine you’re a customer at a restaurant. The waiter (the API) functions as an intermediary between customers like you (the user) and the kitchen (web server). You tell the waiter your order (API call), and the waiter requests it from the kitchen. Finally, the waiter will provide you with what you ordered.

The waiter is the intermediary between you and the kitchen. In this metaphor, the waiter is effectively an abstraction of the API. In software engineering, an abstraction is a fundamental concept that aims to simplify a complex mechanism by only focusing on the details of higher importance. In this example, as a customer, you don’t need to know how the kitchen or the restaurant operates in order to get what you want: the food. You just need to know how to order it.
An API is also an abstraction of the web server. The application (such as a website or a mobile app) will make an API call for a set of data to display for the end user to consume. The request is made via the API that accesses the web server to retrieve the requested data, which is populated in the user interface.
Note how abstractions are evident at every “level” of the web application. The application doesn’t need to know how the web server works, just how to use the APIs to get the data it needs to display. The end user doesn’t need to know how the APIs work, just how to navigate the user interface to perform the tasks she needs to perform.
In most API requests, there are often a few key pieces of information:
Type of request
Authorization credentials (to prevent mimicked API calls from any attacks on the server)
Types of APIs
The most common discussion you’ll hear about APIs tends to focus on web technologies, but APIs aren’t limited to web services. Here’s a roundup of common (and not so common) APIs.
REST APIs
If you’ve heard people talk about JSON (javascript object notation), chances are they’re talking about REST APIs. Over 70% of all public APIs use REST, because of its fast performance, reliability, and ability to scale by reusing modular components without affecting the system as a whole.
How do REST APIs work?
REST, or “representational state transfer,” is a type of software design that gives access to data (aka “web resources”) by using a uniform and predefined set of operations. The payload - the data to be delivered - defined in the request itself, will be formatted in a language such as HTML, JSON, or XML. The set of operations are the methods available to HTTP, which is the underlying protocol for how browsers retrieve websites from servers. These methods include GET, POST, PUT, DELETE, and others.
There are four parts of a REST API request:
URI (uniform resource identifier, which is the URL address, also known as an “endpoint”)
HTTP method (most commonly either GET or POST)
Headers (which include authentication tokens, define the data format of the response, impose rate limits, and perform other administrative tasks)
Body (the actual part of the request)
SOAP APIs
SOAP, or “Simple Object Access Protocol,” is a bit more complex than REST because it requires more information upfront about security and how it sends messages. These additional standards require more overhead, and as a result, SOAP - an API standard that has been around since the late 1990s - tends to lack the lightweight portability and flexibility of REST.
Browser APIs
A browser is capable of creating a wide variety of user experiences, such as playing music, displaying intricate animations, and reacting to mouse or keyboard input. A browser gives control of these experiences to web developers via browser APIs using javascript to manipulate the HTML or create unique experiences within a browser instance.
iOS/Android APIs
Similar to browser APIs, each mobile platform has its own set of APIs that provides developers the tools to build experiences for their end users. App developers can use these APIs to transmit data to the device’s hardware, use a sensor from the hardware such as a camera, play music or video, or perform many other capabilities.
Now Let take REST APIs into more details by developing a blogging API And its work through
Introduction
With over 600 million blogs on the internet, you’ve likely encountered one or two blogs—you’re even on one right now. But you may still wonder what exactly is a blog? How does it differ from a website? Why does every business seem to have one? You may even ask yourself, how can I start my own blog?
In short, many individuals and businesses create a blog to share their ideas and expertise as well as boost their online presence. This article will answer your most pressing blogging questions and help you understand how and why blogs succeed, plus show how you can utilize them.
What is a blog?
Blogs are regularly updated websites that provide insight into a certain topic. The word blog is a combined version of the words “web” and “log.” At their inception, blogs were simply an online diary where people could keep a log about their daily lives on the web. They have since morphed into an essential forum for individuals and businesses alike to share information and updates. In fact, many people even make money blogging as professional full-time bloggers.
Various types of blogs include tech, lifestyle, fashion, beauty, health and fitness, education, travel, photography, etc.
In this article, we are going to discuss how to build a fully-functional blog API and this covers:
Creating an express server
Database implementation with MongoDB
Users' routes
Posts' routes
Fetching data with queries
Security
Prerequisites
Basic Understanding ofJavaScript
Understanding how blogs work
Basic understanding of Node.js and MongoDB database
VSCode IDE Knowleged
Setup Environment And Installations
Setting up Node.js
To install Node.js, click on this link, select LTS(Long Time Support version) and download based on your operating system.
Testing endpoints
PostMan or Thunder Client can be used for testing the routes/endpoints.
In this article, we shall be using PostMan which will be installed later in the article.
How to use PostMan
MongoDBAlas.
MongoDB is a document database and NoSQL database, designed for ease of development and scaling. It offers both local and cloud-based deployment options. In this article, we shall be using the online deployment option called 'MongoDB Atlas'.
Click here for a step-by-step guide on how to used MongoDBAtlas on your system.
Overview
Users have the privilege to signup for new accounts, log in with username and password after being verified, and create, read, update and delete posts.
Dependencies
nodemon - nodemon is a tool that helps develop node-based applications by automatically restarting the node application when file changes in the directory are detected.
Express - Express is a free and open-source Node.js web application framework. Built on top of the Node.js built-in HTTP module, Express helps us set up routing and handle the request/response cycle.
bcrypt - bcrypt turns a simple password into fixed-length characters called a hash. Before hashing a password, bcrypt applies a salt, a unique random string that makes the hash unpredictable.
body-parser - body-parser is the Node.js body parsing middleware. It is responsible for parsing the incoming request bodies in a middleware before you handle it.
crypto-js - crypto-js is a module in Node. js which deals with an algorithm that performs data encryption and decryption. This is used for security purposes like user authentication where storing the password in Database in the encrypted form.
dotenv - The dotenv package is a great way to keep passwords, API keys, and other sensitive data out of your code. It allows you to create environment variables in a . env file instead of putting them in your code.
express-rate-limit - express-rate-limiting is a strategy you can use to control traffic on a network, secure backend API and limits the number of unwanted requests that a user can make within a specific time frame.
helmet - helmet fills in the gap between Node.js and Express.js by securing HTTP headers that are returned by your Express apps.
joi - joi is used for schema description and data validation.
joi-password - joi-password is an extension of joi that helps in validating passwords.
jsonwebtoken - Often called JWT, or JSON Web Token. JWTs are mainly used for authentication. After a user signs in to an application, the application then assigns JWT to that user. Subsequent requests by the user will include the assigned JWT. This token tells the server what routes, services, and resources the user is allowed to access .is an open standard used to share secured information between two parties securely — a client and a server.
mongoose- mongoose is an Object Data Modeling (ODM) library for MongoDB, distributed as an npm package. It allows developers to enforce a specific schema at the application layer.
morgan - morgan is a Node. js and Express middleware to log(taking records of events that occur in a software) HTTP requests and errors, and simplifies the process.
morgan-json - morgan-json provides format functions that output JSON(Javascript Object Object Notation).
winston - winston is designed to be a simple and universal logging library with support for multiple transports.
Project Structure
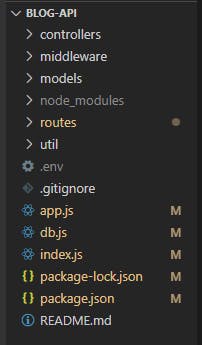
Setting Up The Project
On the desktop, create a folder and call it Blog-API. Open this folder in your VS Code. To confirm if the node was properly installed, type node --version or node -v in the terminal. This shows you the version of the node is installed.
Then type npm init -y. This will create a package.json file. The -y stands for yes to all prompts.
Alternative to npm , another package manager such as yarn can be used.
npm init -y
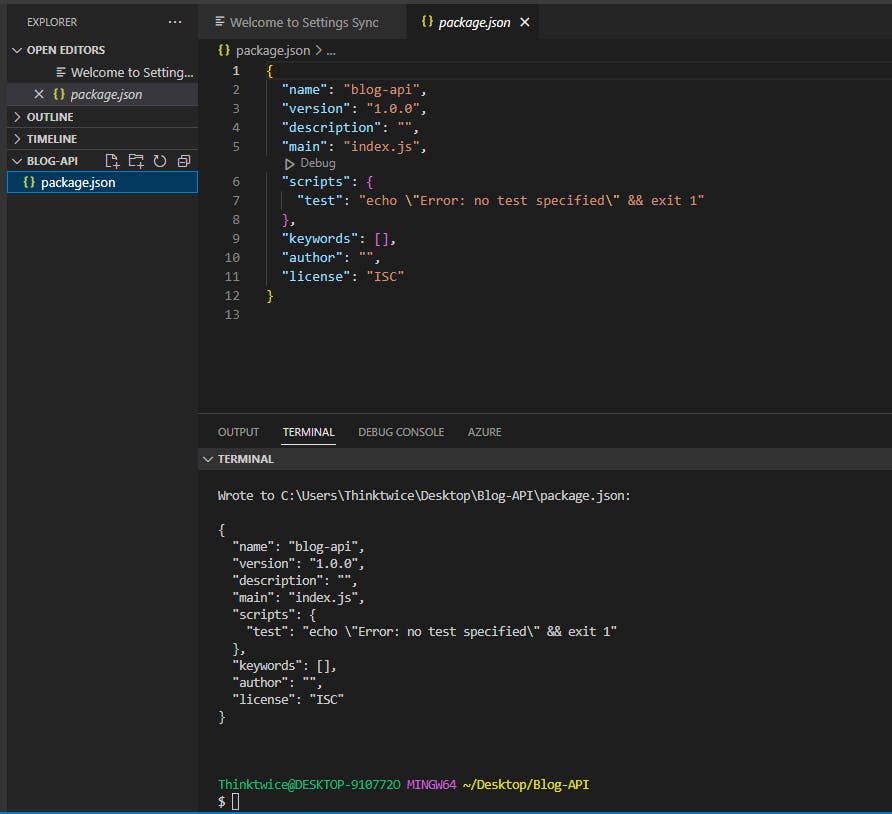
package.json file;
{
  "name": "blog-api",
  "version": "1.0.0",
  "description": "",
  "main": "index.js",
  "scripts": {
    "test": "echo \"Error: no test specified\" && exit 1"
  },
  "keywords": [],
  "author": "",
  "license": "ISC"
}
Creating A Basic Express Server
Here, we need to install some dependencies - express, dotenv and nodemon - which we shall be used in this section to create a server.
In the terminal, type the code below to install all three dependencies at once
npm install express dotenv
or
npm i express dotenv
which install express and the dotenv dependencies
and follow by installing the nodemondependency
npm install --save-dev nodemon
Notice how nodemon was installed in a slightly different way, this is so because it's a development dependency which means it's only used during development, unlike express, mongoose and dotenv which are used in both development and production.
You'll notice that the word install can be replaced with the letter i, and numerous dependencies can be installed all at once by calling them all together, just as we've used. These are just shortcuts used during installation.
{
  "name": "blog-api",
  "version": "1.0.0",
  "description": "",
  "main": "index.js",
  "scripts": {
    "test": "echo \"Error: no test specified\" && exit 1"
  },
  "keywords": [],
  "author": "",
  "license": "ISC",
  "dependencies": {
    "dotenv": "^16.0.3",
    "express": "^4.18.2"
  },
  "devDependencies": {
    "nodemon": "^2.0.20"
  }
}
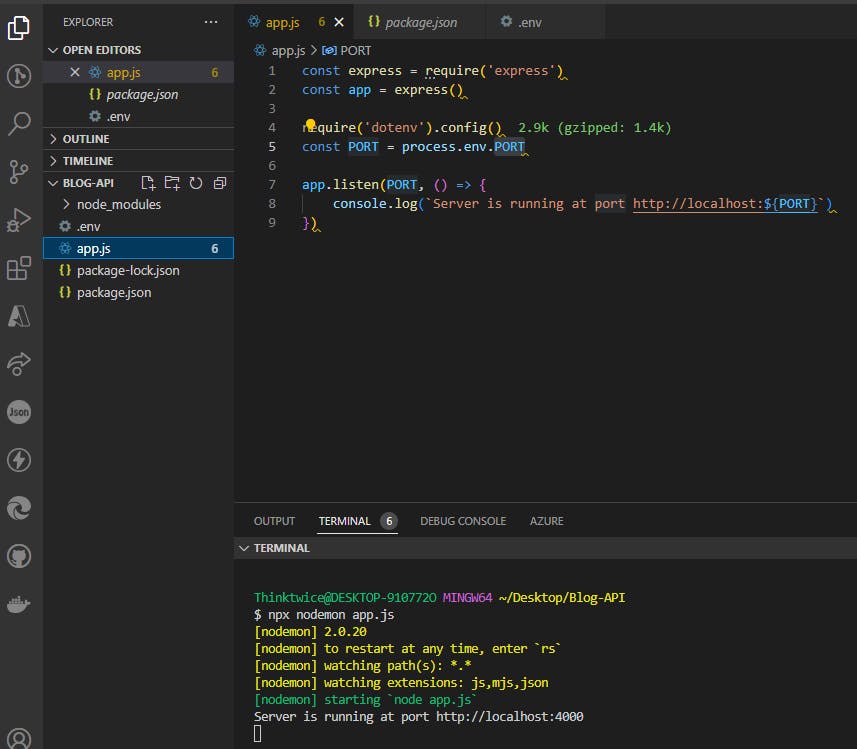
After successfully installing the dependencies(sometimes also referred to as libraries), we create an app.js file in the Blog-API folder. The app.js should contain the code below:
app.js file
const express = require('express')
const app = express()

const PORT = 4000

app.listen(PORT, () => {
    console.log(`Server is running at port http://localhost:${PORT}`)
})
In the code snippet above, the word require is used to import the installed libraries to be used. We used this to import the express library and then create an instance of the library called app. PORT is set to 4000, you can however choose to set your port to any 4-digit value greater than 1024, as long as it's not been used by other programs on your system.
To run app.js , go to the terminal and run nodemon app.js or just nodemon app this is going to start the server.
terminal
npx nodemon app.js

Any time there's a change made in the code and saved, the server restarts automatically. This is nodemon in action!
Understanding package.json, package-lock.json and node_modules
You will notice two(2) files and one(1) folder that got created automatically in Blog-API folder - package.json, package-lock.json and node_modules respectively. This is normal and it happens when we install our first dependency.
The package.json file records important metadata about a project, it also defines functional attributes of a project that npm uses to install dependencies, run scripts, and identify the entry point to our package.
The package-lock.json is essentially used to lock dependencies to a specific version number. This file is automatically generated (or re-generated) when there is a change in either the node_modules tree or package. json .
The node_modules directory stores modules that can be loaded by the Node. js require() function.
Handling .Env Data
Data handling is important in ensuring the integrity of research data since it addresses concerns related to confidentially, security, and preservation/retention of research data. Proper planning for data handling can also result in efficient and economical storage, retrieval, and disposal of data.
As a result of this, there's a need to protect the PORT used in the server.
To achieve this, create a .env file in Blog-API folder and type the code below:
.env file
PORT=4000
The .env helps to hide or keep secret data.
Next, inside app.js, replace const PORT = 4000 with the code below:
const PORT = process.env.PORT
To make .env effective, we require and configure the package by calling require('dotenv').config(). So the app.js file becomes:
app.js
const express = require('express')
const app = express()

require('dotenv').config()
const PORT = process.env.PORT

app.listen(PORT, () => {
    console.log(`Server is running at port http://localhost:${PORT}`)
})
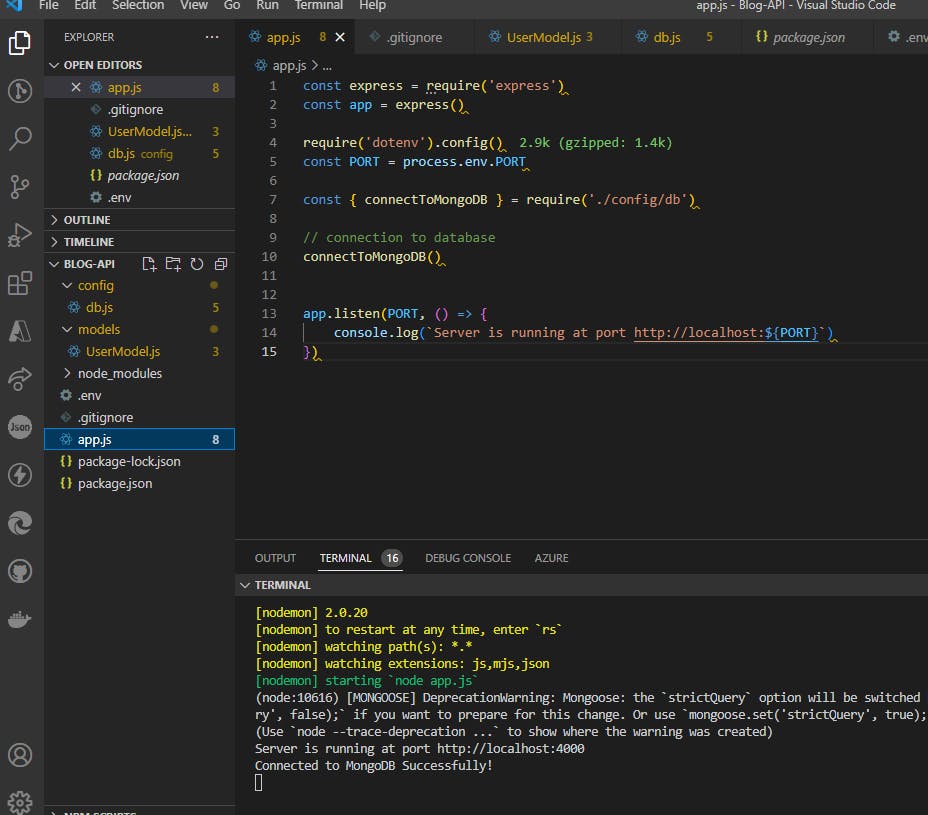
Make sure to save every file created. nodemon will automatically restart the server.
updated project:-
You should get this response in your terminal as well -
Server is running at port http://localhost:4000
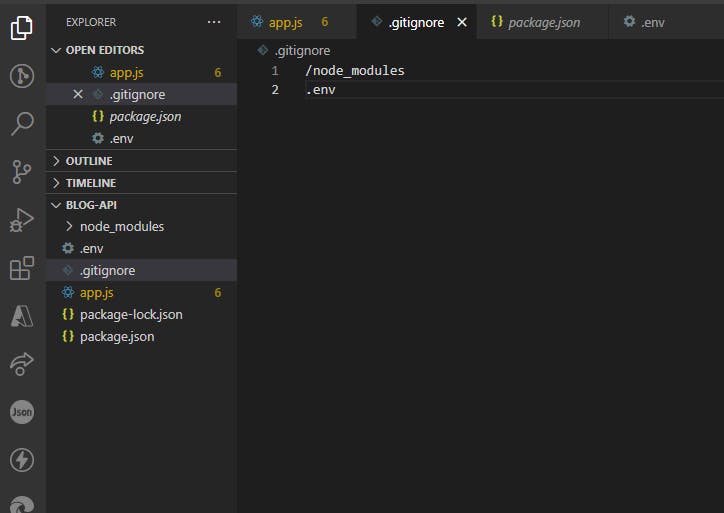
Next, we are going to hide the node_modules and .env files in a file called .gitignore.
As more dependencies are installed, the node_modules folder grows even larger (in memory). This, however, shouldn't be committed to GitHub.
.gitignore tells Git which files to ignore when committing a project to the GitHub repository.
Create a .gitignore file in the root folder i.e. directly inside MyBlogAPI folder, and type inside it the code below:
.gitignore
/node_modules
.env
Database Integration (with mongoDB)
In this section, we shall be implementing the MongoDB to be integrated with the API project and as such install, a dependency/package/library called mongoose. This helps to create a basic structure of the document, referred to as schema .
Schema
schema maps to a MongoDB collection and defines the shape of the documents within that collection.
Not to worry if you are getting overwhelmed at this point, I will walk you through, step-by-step, the entire process.
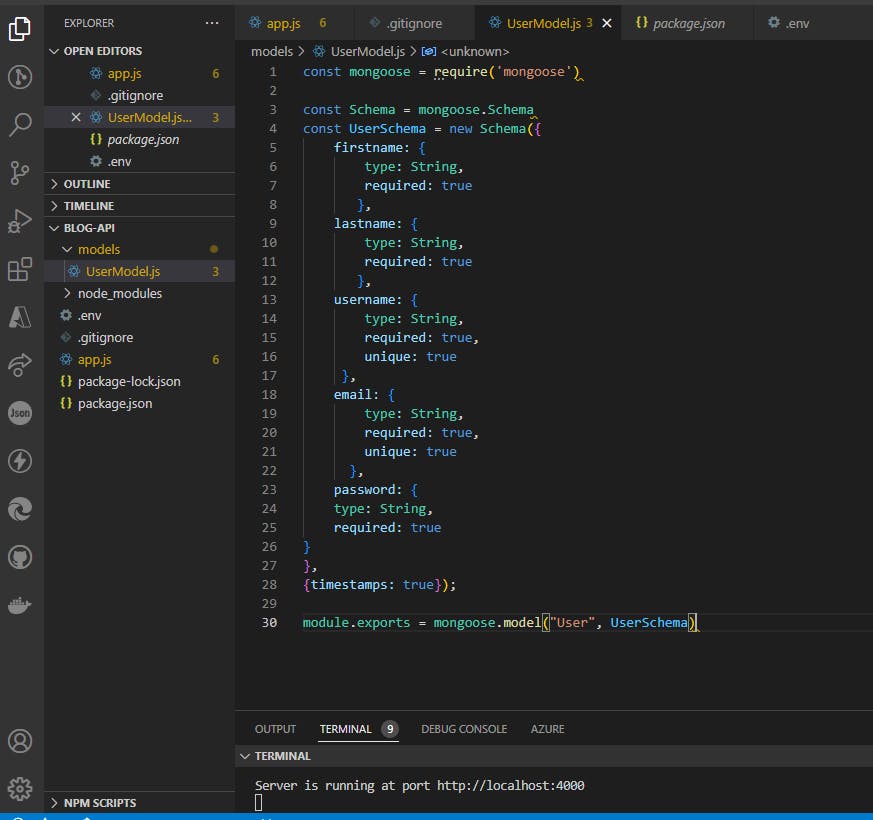
Create a folder called models in the root directory. This models should contain a file called User.js , or better still, let's call it UserModel.js for a more descriptive naming, indicating that the file belongs to the models folder .
We will define the UserSchema object in this file.
In the UserModel.js file, we import the mongoose dependency and create the schema structure. The UserSchema contains the necessary user data schema - firstname , lastname , username , username , email and password.
const mongoose = require('mongoose')

const Schema = mongoose.Schema
const UserSchema = new Schema({
    firstname: {
        type: String,
        required: true
       },
    lastname: {
        type: String,
        required: true
       },
    username: {
        type: String,
        required: true,
        unique: true
     },
    email: {
        type: String,
        required: true,
        unique: true
      },
    password: {
    type: String,
    required: true
}
},
{timestamps: true});

module.exports = mongoose.model("User", UserSchema)
Now, let's integrate the entire process to link the schema to MongoDB.
Create a folder called config in the root directory. This config should contain a file called db.js which simply stands for the database. Here, we set up the database connection and export it as a function.
Type the code below inside db.js.
db.js file
const mongoose = require("mongoose");
require("dotenv").config()

const MONGO_URL = process.env.MONGO_URL

//checking the connection
function connectToMongoDB(){
    mongoose.connect(MONGO_URL)

    mongoose.connection.on("connected", () => {
        console.log("Connected to MongoDB Successfully!");
    });

    mongoose.connection.on("error", (err) => {
        console.log("An error occurred while connecting to MongoDB");
        console.log(err);
    })
}

module.exports = {
    connectToMongoDB
}
In app.js , we import the db.js , destructure connectToMongoDB and call connectToMongoDB as a function. This connects the app to the database.
Type the code below inside app.js .
app.js
const express = require('express')
const app = express()

require('dotenv').config()
const PORT = process.env.PORT

const { connectToMongoDB } = require('./config/db')

// connection to database
connectToMongoDB()


app.listen(PORT, () => {
    console.log(`Server is running at port http://localhost:${PORT}`)
})
Go to mongoDBAtlas we talk about earlier, copy the URI-mongodb+srv://Aliyugambo:@cluster0.y6josrb.mongodb.net/?retryWrites=true&w=majority provided.
Next, go to the .env file and insert the URI - MONGO_URL=mongodb+srv://Aliyugambo:@cluster0.y6josrb.mongodb.net/?retryWrites=true&w=majoritywhere Blog-API is the name of the database(you can choose to give it any other name of your choice). This code helps to create Blog-API's database and collection in the mongoDBAtlas
Not to worry if you are getting overwhelmed at this point, I will walk you through, step-by-step, the entire process.
Now to connect our application with mongoDBAtlas.
MongoDBAtlas
MongoDB Atlas provides an easy way to host and manage your data in the cloud. This tutorial guides you through creating an Atlas cluster, connecting to it, and loading sample data.
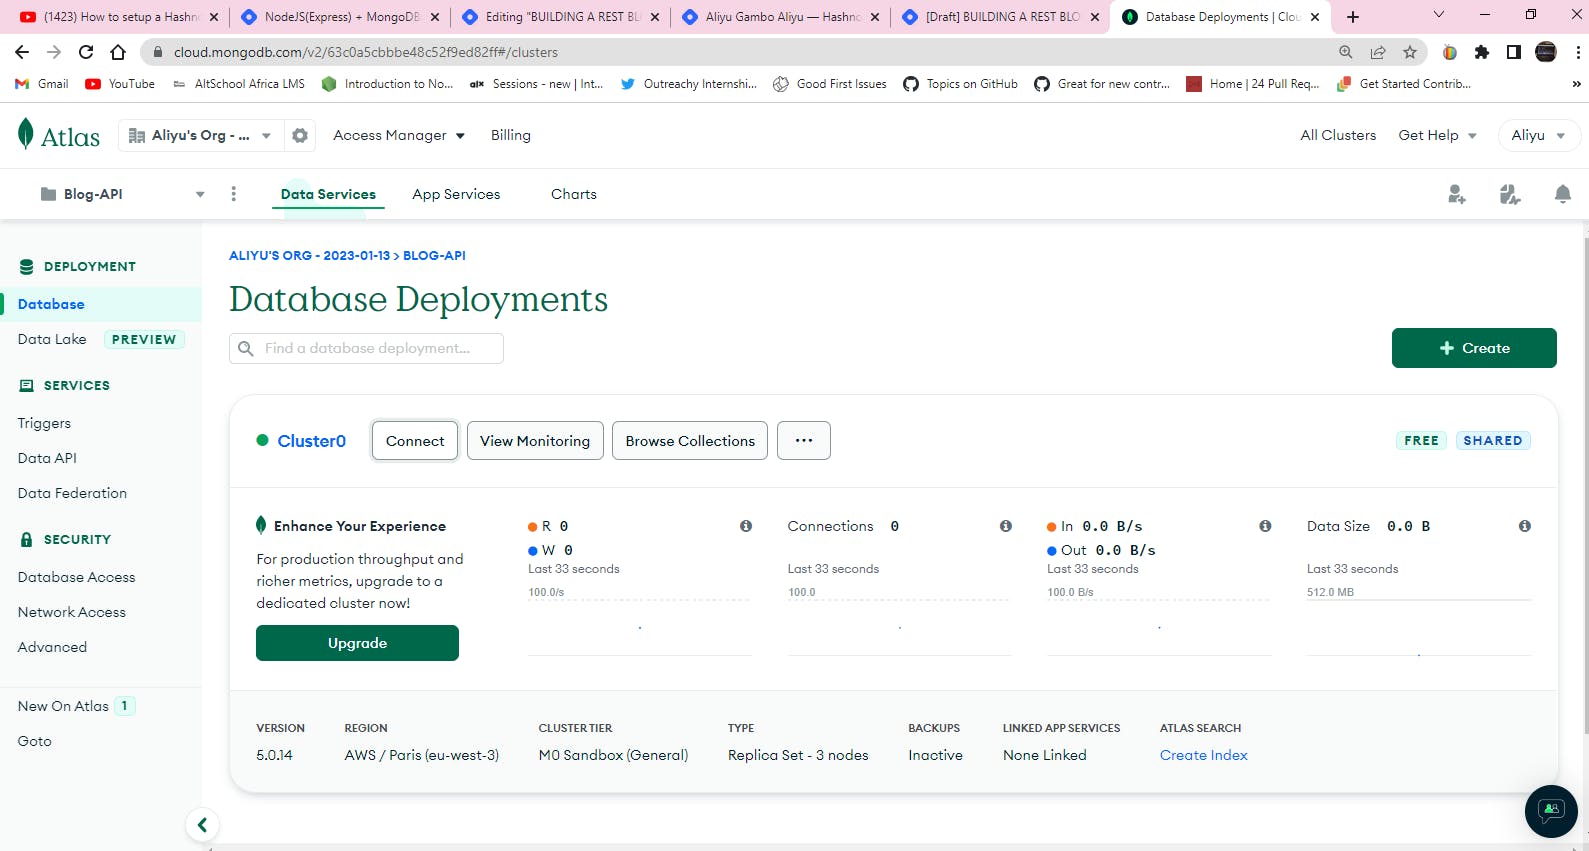
You can get started with Atlas through the Atlas CLI or the Atlas User Interface. Select a tab based on how you would like to get started:
.env file
PORT=4000
MONGO_URL=mongodb+srv://Aliyugambo:<password>@cluster0.y6josrb.mongodb.net/Blog-API?retryWrites=true&w=majority
Make sure all files are saved and nodemon is still running the server!
If all are done correctly You should now be connected to the database, as confirmed in the terminal Connected to MongoDB Successfully! . Ignore the deprecation warning shown in the terminal for now.
Users' Sign-up
Installing/Importing Necessary Files and Libraries
In this section, we shall be creating users' registration and login routes. A user will be able to log in after being authenticated and verified.
For this, there's a need to use some authentication libraries. In this article, we shall be using jsonwebtoken and crypto-js .
Let's install them.
In the terminal, type and run the code below:
terminal
npm i jsonwebtoken crypto-js
Then we create a folder in the root directory and name it controllers . In this folder controllers , create a file called authcontroller.js . By now, you should be familiar with this naming convention.
Let's import some files and libraries in the authcontroller.js file. We shall be using them to create the signup and login functions.
authcontroller.js file
  const User = require("../models/UserModel");
  const CryptoJS = require("crypto-js");
  const SECRET_KEY = process.env.SECRET_KEY
  const jwt = require('jsonwebtoken');
  const JWT_SECRET = process.env.JWT_SECRET
In the code above, we import the necessary file and libraries and set them to their respective variable names, using const .
Here's an explanation of what each declared variable does.
User is used in creating a User object from the UserModel.js . It provides the user, the privilege to fill in their details during registration and login.
CryptoJS is used to encrypt the password given by the user.
SECRET_KEY is responsible for the hashing action of the CryptoJS library.
JWT_SECRET generates the jwt(token).
Before proceeding to write the signup and login functions in the authcontroller.js , there's a need to secure the SECRET_KEY and the JWT_SECRET by adding them in the .env file, then assigning random values to them which will serve as secret keys.
.env file
 PORT=4000
MONGO_URL=mongodb+srv://Aliyugambo:Thinktwice1234@cluster0.y6josrb.mongodb.net/Blog-API?retryWrites=true&w=majority
SECRET_KEY=abcd1234
JWT_SECRET=67985bcf
Sign-up Function
In the authcontroller.js , let's implement the signup function that will give aspiring users the privilege to register.
authcontroller.js
onst jwt = require('jsonwebtoken');
const UserModel = require('../models/userSchema');
const CryptoJS = require("crypto-js");
const SECRET_KEY = process.env.SECRET_KEY
const JWT_SECRET = process.env.JWT_SECRET
require('dotenv').config();


//Sign_Up
const signup = async (req, res)=> {
    try {
        const encryptedPassword = CryptoJS.AES.encrypt(req.body.password,                                 SECRET_KEY).toString()
        const newUser = new User({
            firstname: req.body.firstname,
            lastname: req.body.lastname,
            username: req.body.username,
            email: req.body.email,
            password: encryptedPassword,
        });

        const user = await newUser.save();
        res.status(200).json({
            "message": "Registered Successfully!",
            user
        })
    } catch (err) {
        res.status(500).json(err);
    }
}
The signup function is an async function that helps to handle operations asynchronously. This permits the await keyword within the function.
The req and res parameters passed to the signup function represents the request of the user and the response sent back to the user respectively.
req is an object containing information about the HTTP request that raised the event. In response to req, res sends back the desired HTTP response.
The firstname , lastname , username , email and password are the values passed in by the user. This is done using the req.body property which contains key-value pairs of data submitted in the request body.
An HTTP 200 OK success status response code indicates that the request is successful, while an HTTP 500 Internal Server Error server error response code indicates that the server encountered an unexpected condition that prevented it from fulfilling the request.
Next, let's create a route for the signup using express.Router() with POST method. A route is a URL path or section of an Express code that associates an HTTP verb. HTTP verb defines a set of request methods to indicate the desired action to be performed for a given resource( GET , POST , PUT , DELETE , etc.). The express.Router() function is used to create a new router object which is used to create a new router object in the program to handle requests.
Let's create a folder in the root directory and name it routes. In this folder routes, create a file called auth.route.js . In the auth.route.js , we integrate the signup function which was created earlier in the userauthController.js , with the POST method to create a route called register . The express.Router() which is set to a variable called AuthRouter is then exported for use in other programs by using the module.exports .
auth.route.js file
const express = require('express');
const userRoute = express.Router();
const {Signup} = require('../controllers/userauthController');

userRoute.post('/register', Signup);

module.exports = userRoute;
In the app.js , we import the AuthRouter and use it as middleware .
app.js file
const authRoute = require("./routes/auth.route")
app.use("/api/auth", authRoute)
const authRoute = require("./routes/auth.route") imports the auth.route.js and
app.use("/api/auth", authRoute) is used to mount authRoute at "/api/auth" path.
app.js file updated!
const express = require('express')
const app = express()

require('dotenv').config()
const PORT = process.env.PORT

const { connectToMongoDB } = require('./config/db')

const authRoute = require("./routes/auth.route")

// connection to database
connectToMongoDB()

// middleware
app.use(express.json())
app.use("/api/auth", authRoute)


app.listen(PORT, () => {
    console.log(`Server is running at port http://localhost:${PORT}`)
})
Refresh the MongoDBAtlas on your browser.
And we got this page, click on the Browse Collections
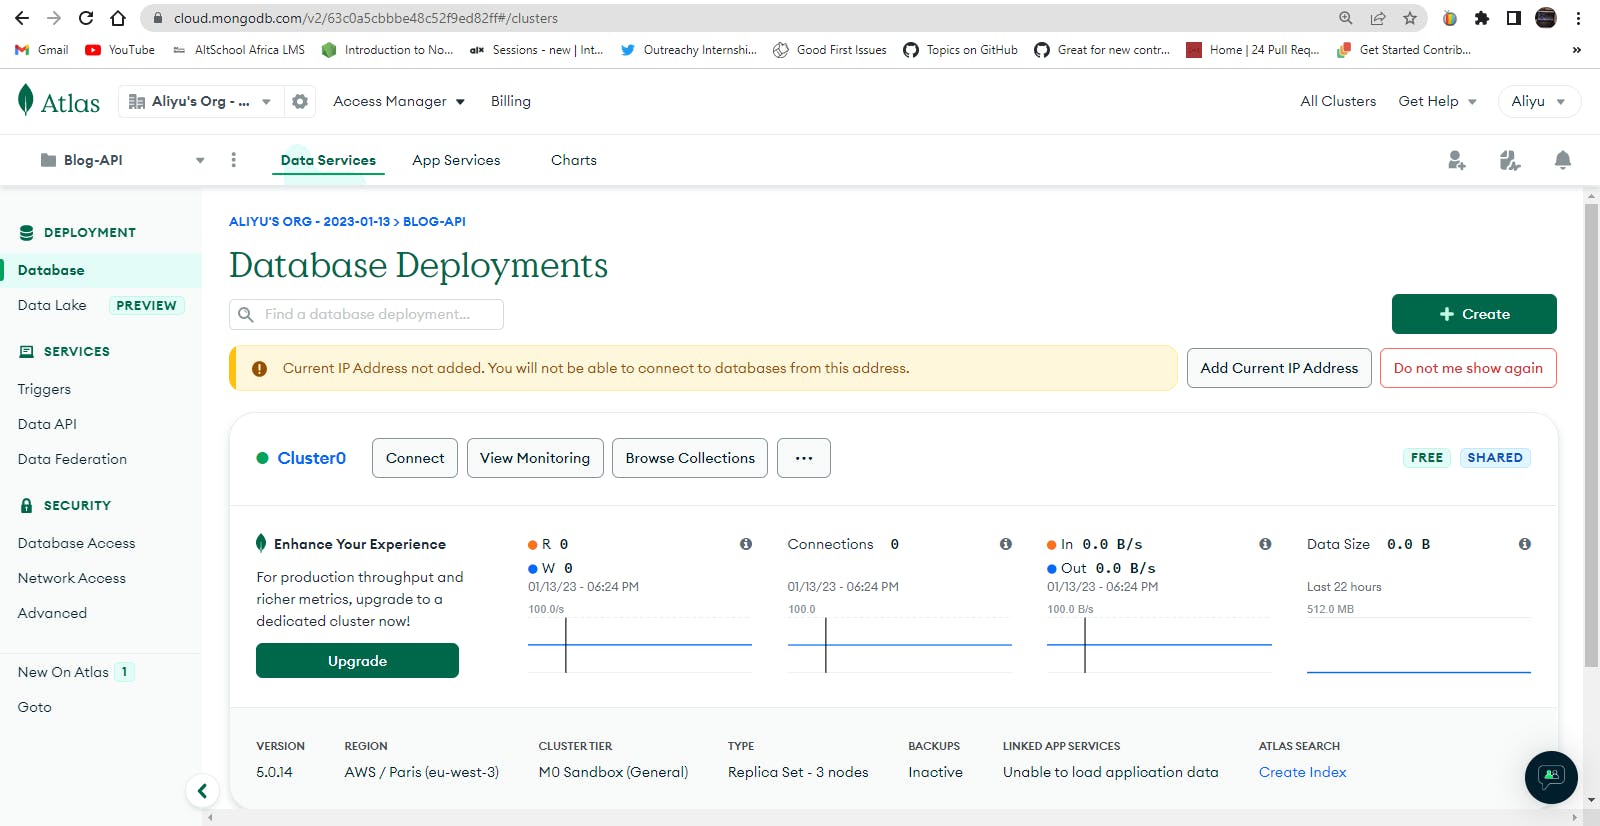
Now we see the database Blog-API present in the database by the Top-left.
Click on the Browse Collections button, you should see users collection which was created earlier in the UserModel.js file. For now, there's no data in the users collection.
Registering The User
Go to app.js and put in this code app.use(express.json())
express.json() is a built-in middleware function in Express. It parses incoming requests with JSON payloads and is based on body-parser .
Remember the /api/auth path in app.js and the register route in auth.route.js , they form the users' signup endpoint.
app.js file updated!
const express = require('express')
const app = express()

require('dotenv').config()
const PORT = process.env.PORT

const { connectToMongoDB } = require('./config/db')

const authRoute = require("./routes/auth.route")

// connection to database
connectToMongoDB()

// middleware
app.use(express.json())
app.use("/api/auth", authRoute)


app.listen(PORT, () => {
    console.log(`Server is running at port http://localhost:${PORT}`)
})
Go on to your PostMan application being discuss above insert the endpoint-
http://localhost:4000/api/auth/register and supply the user's registration data on the Body as defined in the schema.
User Sign-up Data Sample
{
    "firstname": "AGA",
    "lastname": "Gambo",
    "email": "agathinktwice123@gmail.com",
    "username": "Thinktwice",
    "password": "Thinktwice123"
}
User Sign-Up (with PostMan)
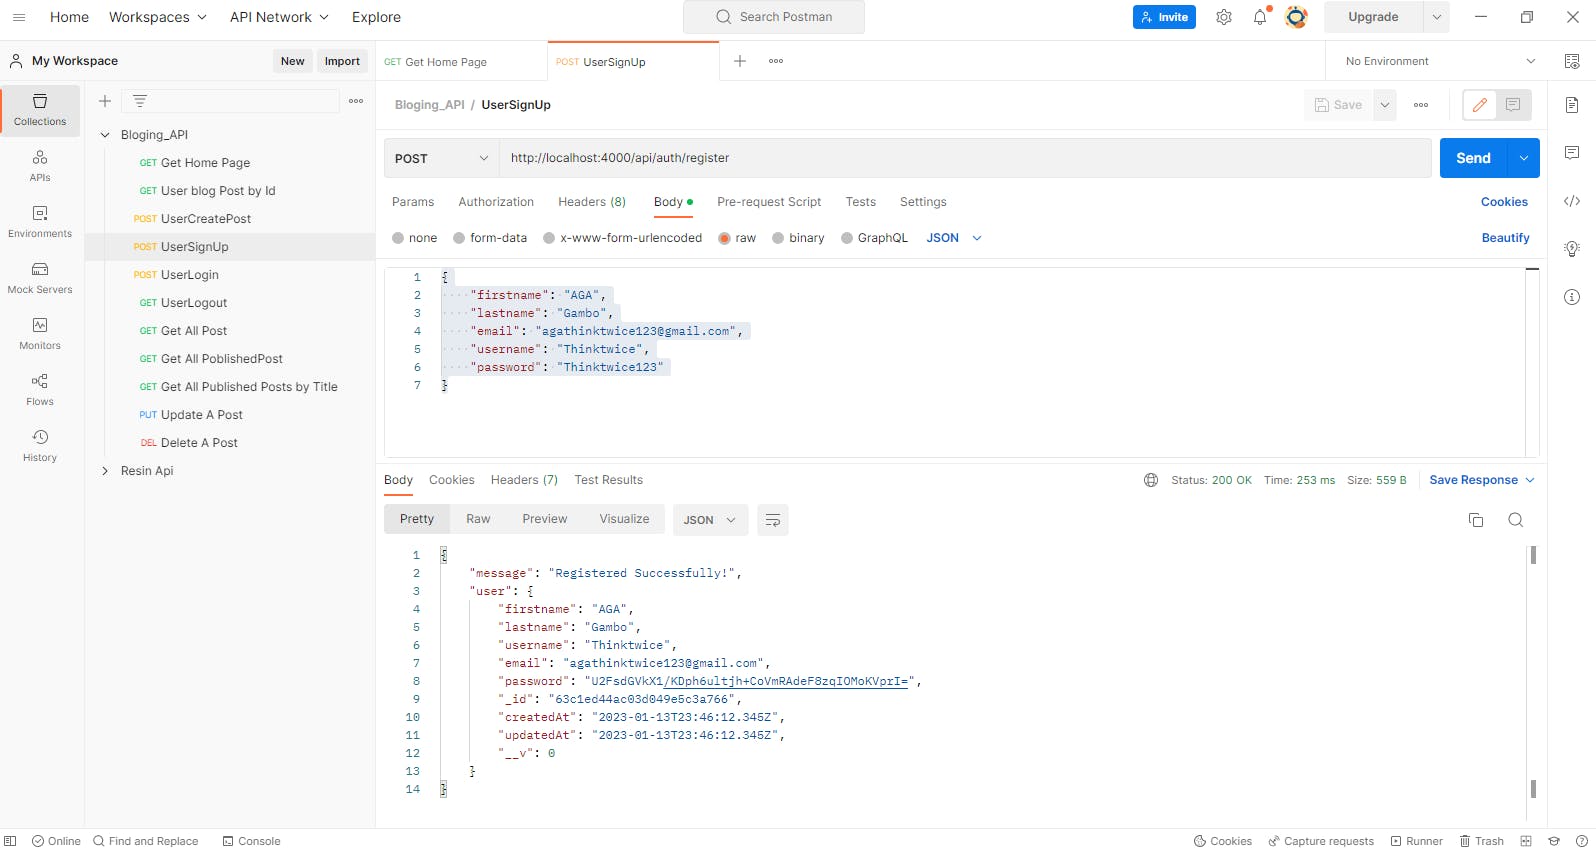
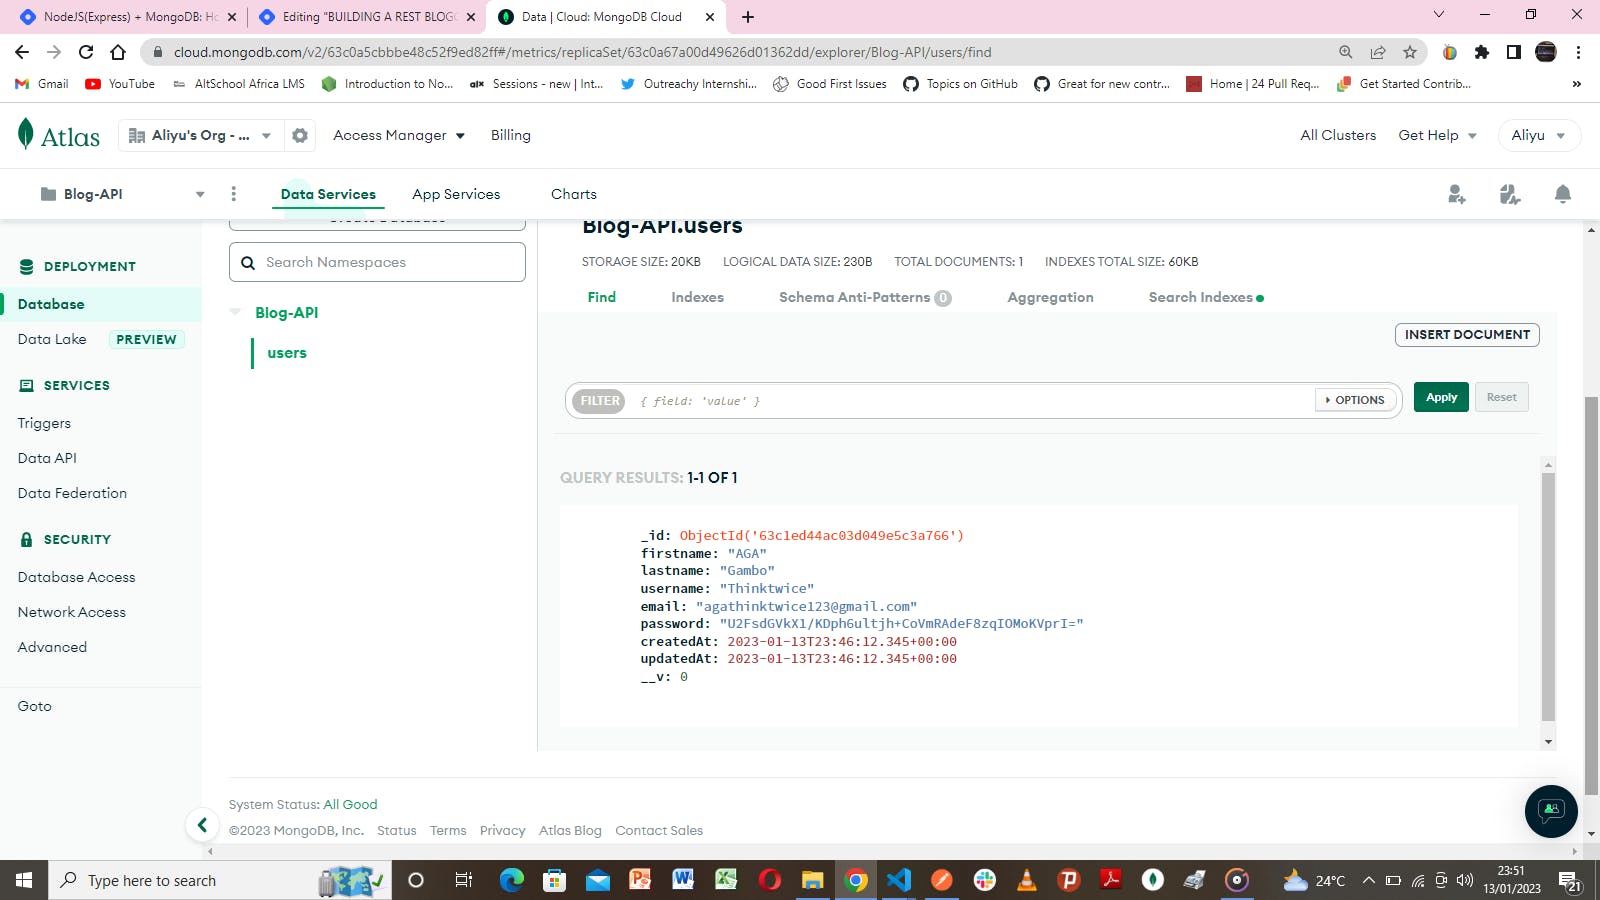
This registers the user as can be seen on the down side of the PostMan. Also, refresh the mongoDBAtlas , we see that the user data has persisted.
MongoDBAtlas
User Login
In this section, we shall be discussing how to implement a user's login . Similarly to the signup implementation, we create a login function in auth.controller.js .
Necessary libraries have been installed during signup implementation.
Login Function
In the auth.controller.js , let's implement the login function that will give aspiring users the privilege to log in to their accounts.
// login function
const login = async (req, res) => {
    try {
        const user = await User.findOne({ username: req.body.username });
        !user && res.status(400).json("Wrong username or password!");

        const decryptedPassword = CryptoJS.AES.decrypt(user.password, PASSWORD_SECRET_KEY);
        const OriginalPassword = decryptedPassword.toString(CryptoJS.enc.Utf8);

        OriginalPassword !== req.body.password && res.status(401).json("Wrong login details!");

        const accessToken = jwt.sign({
            id: user._id
        }, JWT_SECRET_TOKEN, {expiresIn: "1h"}
        );

        // Destructuring the user to send other details except password
        const { password, ...other } = user._doc;
        res.status(200).json({
            "message": "Login Successful!",
            ...other,
            accessToken
        });
    } catch (err) {
        res.status(500).json(err);
    }
}
module.exports = { login }
Next, In the auth.route.js , we integrate the login function in the auth.controller.js , with the POST method to create a route called login .
We insert this code:
AuthRouter.post("/login", AuthController.login);
auth.route.js file
const express = require('express');
const AuthRouter = express.Router();

const AuthController = require("../controllers/auth.controller")

// Register
AuthRouter.post("/register", AuthController.signup);

// Login
AuthRouter.post("/login", AuthController.login);


module.exports = AuthRouter
auth.controller.js file updated!
const User = require("../models/UserModel");
const CryptoJS = require("crypto-js");
const SECRET_KEY = process.env.SECRET_KEY
const jwt = require('jsonwebtoken');
const JWT_SECRET = process.env.JWT_SECRET

// sign-up function
const signup = async (req, res)=> {
    try {
        const encryptedPassword = CryptoJS.AES.encrypt(req.body.password,SECRET_KEY).toString()
        const newUser = new User({
            firstname: req.body.firstname,
            lastname: req.body.lastname,
            username: req.body.username,
            email: req.body.email,
            password: encryptedPassword,
        });

        const user = await newUser.save();
        res.status(200).json({
            "message": "Registered Successfully!",
            user
        })
    } catch (err) {
        res.status(500).json(err);
    }
}

// login function
const login = async (req, res) => {
    try {
        const user = await User.findOne({ username: req.body.username });
        !user && res.status(400).json("Wrong username or password!");

        const decryptedPassword = CryptoJS.AES.decrypt(user.password, PASSWORD_SECRET_KEY);
        const OriginalPassword = decryptedPassword.toString(CryptoJS.enc.Utf8);

        OriginalPassword !== req.body.password && res.status(401).json("Wrong login details!");

        const accessToken = jwt.sign({
            id: user._id
        }, JWT_SECRET_TOKEN, {expiresIn: "1h"}
        );

        // Destructuring the user to send other details except password
        const { password, ...other } = user._doc;
        res.status(200).json({
            "message": "Login Successful!",
            ...other,
            accessToken
        });
    } catch (err) {
        res.status(500).json(err);
    }
}


module.exports = { signup,login}
The findOne() function is a mongoose model used to find one document according to the condition. If multiple documents match the condition, then it returns the first document satisfying the condition.
Here, we supply a username and a corresponding password used during registration, if found, the password is compared with the encrypted password supplied during registration to find a match. If there's a match, a secret token is generated by jwt with a duration of one(1) hour. At token expiration, the user is forcefully logged out of the application. The user , therefore, will be required to login again to have access.
Here, the /api/auth path in app.js and the login route in auth.route.js form the users' login endpoint.
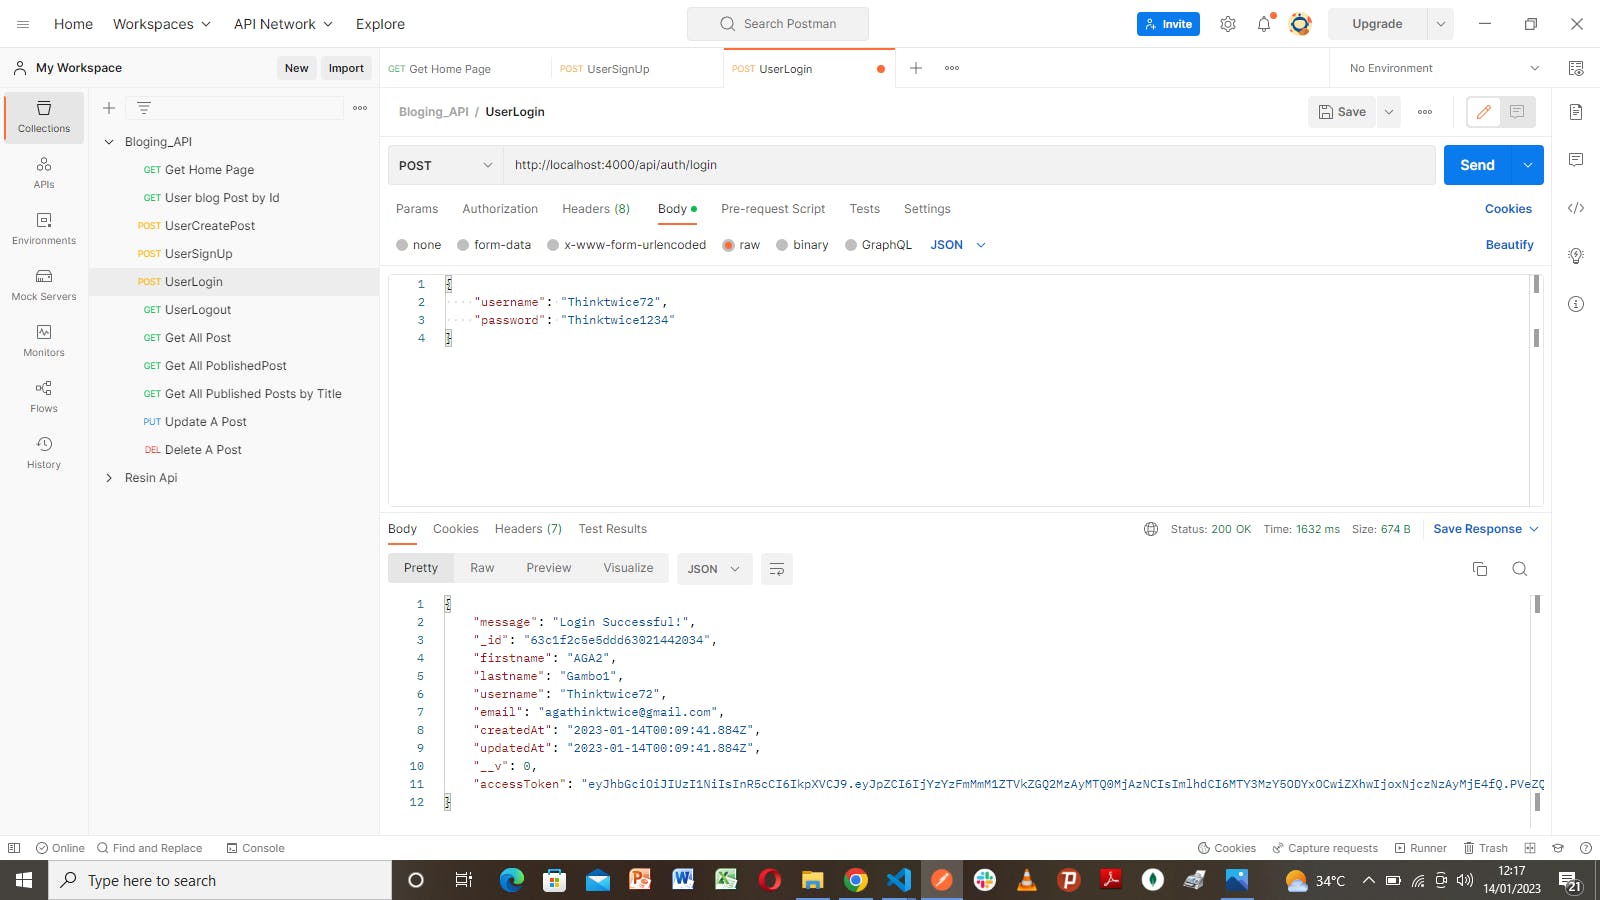
On the PostMan, we insert the endpoint -
http://localhost:4000/api/auth/login and supply the user's registration data on the Body as defined in the schema, using the POST method.
User Access
User's Login Data Sample
{
    "username": "Thinktwice72",
    "password": "Thinktwice1234"
}
User Login PostMan

Notice the accessToken generated. That's JWT_SECRET in action.
That's it for the Users' Sign-up and Login.
Before we move to the next section, let's do a quick update.
In package.json , replace index.js in value with app.js .
Also, add "dev": "nodemon app.js" to the scripts .
So, in the terminal, we can run npm run dev instead of nodemon app.js for running the server.
package.json file
{
  "name": "blog-api",
  "version": "1.0.0",
  "description": "",
  "main": "app.js",
  "scripts": {
    "dev":"",
    "test": "echo \"Error: no test specified\" && exit 1"
  },
  "keywords": [],
  "author": "",
  "license": "ISC",
  "dependencies": {
    "crypto-js": "^4.1.1",
    "dotenv": "^16.0.3",
    "express": "^4.18.2",
    "jsonwebtoken": "^9.0.0",
    "mongoose": "^6.8.3"
  },
  "devDependencies": {
    "nodemon": "^2.0.20"
  }
}
Blogs' Routes
Having implemented the User signup and login , we can then implement registered users' posts. Here, users have the privilege to post content on their blogs.
Similarly to the Users' signup route, we define a BlogSchema object in a file located in the models folder. Let's call the file BlogSchema.js .
The BlogSchema contains the necessary user data schema - title, lastname , tags , state , read_count , reading_time , body and author .
state defines whether a post is in draft or published state. By default, the state is in draft .
read_count indicates how many times the post was read.
reading_time tells how
BlogSchema file
const mongoose = require('mongoose')
const User = require("./userSchema")

const blogSchema = new mongoose.Schema(
  {

    title: {
    type: String,
    required: true,
    unique: true,
  },

  description: String,

  author: {
    type: String,
    required: true
  },

  tags: {
    type: [ String ]
  },

  state: {
    type: String,
    enum: ['draft', 'published'],
    default: 'draft'
  },

  readCount: {
    type: Number,
    default: 0
  },

  readingTime: {
    type: Number
  },

  user: {
    type: mongoose.Schema.Types.ObjectId,
    ref: "User"
  },

  body: {
    type: String,
    required: true
  }
},

{ timestamps: true }
);


const blog = mongoose.model('blog', blogSchema);

module.exports = blog;
blogpostController Function
Create a file in the controllers folder, call it BlogpostController.js , let's implement the post function that will give users the privilege to create, read, search, update and delete a post. We refer to these operations as CRUD . Note that, only authorized users have certain privileges like updating and deleting a post. Along with this, we implement the reading_time algorithm.
Create a folder in the root directory, call it utils , then create a file called readTime.js
readTime.js file
// An algorithm that calculates an estimated time to read a blog
const readTime = (post) => {
    const numWords = post.split(" ").length
    const wpm = numWords/200
    return Math.round(wpm) === 0 ? 1 : Math.round(wpm)
}

module.exports = readTime;
This algorithm counts the number of words in the body and divides it by 200, this result is rounded up to the nearest whole number. This gets exported and then imported in the post.controller.js .
post.controller.js file
const readTime = require("../utils/readTime")
const Post = require("../model/Post.model");

// Create Post
const createPost =  async (req, res) => {
    const newPost = new Post(req.body);
    try {
        newPost.reading_time = readTime(newPost.body)
        await newPost.save();
        res.status(200).json({
            message: "Blog created Successfully!",
            newPost
        });
    } catch (err) {
        res.status(500).json(err);
    }
}

// Get Post by ID
const getPost =  async (req, res) => {

        const post = await Post.findById(req.params.id).populate("author");
        // console.log(post)
        if(!post){
            return res.status(404).send('Post not found!')
        }
        post.reading_time = readTime(post.body)
        post.read_count += 1;
        await post.save();

        res.status(200).json(post);
}

// Get All Posts or Search by Title, author or tag
const getAllPosts =  async (req, res) => {
    const title = req.query.title;
    const author = req.query.author;
    const tag = req.query.tag;
    const state = req.query.state;
    const { page=1, limit=20 } = req.query;
    try{
        let posts;
        if(title){
            posts = await Post.find({ title });
        } else if(author){
            posts = await Post.find({ author }).sort({ _id: -1 }).limit(limit*1).skip((page-1)*limit).exec();
        } else if(state){
            posts = await Post.find({ state }).sort({ _id: -1 }).limit(limit*1).skip((page-1)*limit).exec();
        } else if(tag){
            posts = await Post.find({
                tags: {
                    $in: [tag],
                },
            }).sort({ _id: -1 }).limit(limit*1).skip((page-1)*limit).exec();
        } else {
            posts = await Post.find().sort({ _id: -1 }).limit(limit*1).skip((page-1)*limit).exec();

        }
        const count = await Post.countDocuments();
        res.status(200).json({
            message: "Successful!",
            posts,
            totalPages: Math.ceil(count / limit),
            currentPage: page
        });
    } catch(err){
        res.status(500).json(err);
    }
}

// Update A Post
const updatePost =  async (req, res)=> {
   try{
        const updatedPost = await Post.findByIdAndUpdate(req.params.id,{
          $set: req.body
        },
        {new: true}
        );
        res.status(200).json({
            message: "Post has been updated!",
            updatedPost
        });
        } catch (err) {
          res.status(500).json(err);
        }
}

// Delete A Post
const deletePost =  async (req, res)=> {
    try{
        await Post.findByIdAndDelete(req.params.id);
        res.status(200).json("Post has been deleted!");
    } catch (err) {
        res.status(500).json(err);
    }
};

module.exports = {
    createPost,
    getPost,
    getAllPosts,
    updatePost,
    deletePost
}
The CRUDfunctions are all async functions that help to handle operations asynchronously. This permits the await keyword within the function.
The createPostfunction sends a post from the user as a request req and saves it in the database.
The getPostfunction receives specific data from a post in the database by using the id generated in the post. populate function is a mongoose property used for populating the data inside the reference. Meaning, when a post is requested, both the post data and the author's details get returned.
The getAllPostsgives the user the privilege to find, search or filter posts by author , or by title , or by tag. The result is paginated and limited to 20 blogs per page. Posts can also be queried by state .
The updatePostfunction uses the id to find its corresponding post in the database, if found, it updates the post based on the user's discretion.
The deletePostfunction also uses the id to find its corresponding post in the database, if found, it simply removes the posts from the database.
We need to also create a file for the published posts to be located in the controllers folder. This file contains a similar implementation as in the post.controller.js .
publishedPosts.controller.js
const readTime = require("../utils/readTime")
const Post = require("../model/Post.model");

// Get All Published Posts or Search by Title, author or tag
const publishedPosts = async (req, res) => {
    const title = req.query.title;
    const author = req.query.author;
    const tag = req.query.tag;
    let sort = req.query.sort
    const { page=1, limit=20 } = req.query;
    try{
        const ValidSort = ['read_count', 'reading_time', 'timestamp'].includes(sort)
        ValidSort ? null : sort = 'read_count'

        let posts;

        if(title){
            posts = await Post.find({ title });
        } else if(author){
            posts = await Post.find({ author }).find({ state: "published"}).sort({ _id: -1 }).limit(limit*1).skip((page-1)*limit).exec();
        } else if(tag){
            posts = await Post.find({
                tags: {
                    $in: [tag],
                },
            }).find({ state: "published" }).sort({ _id: -1 }).limit(limit*1).skip((page-1)*limit).exec();
        } else {
            posts = await Post.find({ state: "published"}).sort({ [sort]: -1 }).limit(limit*1).skip((page-1)*limit).exec();

        }
        const count = await Post.countDocuments();
        res.status(200).json({
            posts,
            totalPages: Math.ceil(count / limit),
            currentPage: page
        });
    } catch(err){
        res.status(500).json({
            error: "Sorry, No published Posts yet!"
        });
    }
}

module.exports = { publishedPosts }
publishedPosts.route.js file
const express = require('express')
const publishedPostRouter = express.Router();

const PublishedPostController = require("../controllers/publishedPosts.controller")


// Get All Published Posts or Search by Title, author or tag
publishedPostRouter.get("/", PublishedPostController.publishedPosts);

module.exports = publishedPostRouter
The publishedPosts function is integrated into the publishedPostRouter using the GET method.
We export the publishedPostRouter router.
Let's create a folder in the root directory and name it routes. In this folder routes, create a file called auth.route.js . In the auth.route.js , we integrate the signup function which was created earlier in the auth.controller.js , with the POST method to create a route called register . The express.Router() which is set to a variable called AuthRouter is then exported for use in other programs by using the module.exports .
In the app.js file , we import both postRouter and publishedPostRouter then use them as middleware .
app.js file
const express = require('express')
const app = express()

require('dotenv').config()
const PORT = process.env.PORT

const { connectToMongoDB } = require('./config/db')

const authRoute = require("./routes/auth.route")
const postRoute = require("./routes/posts.route")
const publishedPostRoute = require("./routes/publishedPosts.route")

// connection to database
connectToMongoDB()

// middleware
app.use(express.json())
app.use("/api/auth", authRoute)
app.use("/api/posts", postRoute)
app.use("/api/publishedPosts", publishedPostRoute)


app.listen(PORT, () => {
    console.log(`Server is running at port http://localhost:${PORT}`)
})
User Verification/Authentication
This is the process of confirming a user's identity by obtaining credentials and using those credentials to validate their identity.
In this article, we are going to use the jwt token to verify logged-in users to have the CRUD privileges.
In the root folder, we create a folder called middleware . In this folder, create a file called verifyBearerToken . This file contains a verifyToken function which grabs the token provided in the Thunder Client's Http Headers . This file is exported, then imported in the posts.route.js and used as a middleware.
verifyBearerToken file
const jwt = require('jsonwebtoken');
const JWT_SECRET= process.env.JWT_SECRET;

const verifyToken = (req, res, next)=>{
    const authHeader = req.headers.token
    if(authHeader){
        const token = authHeader.split(" ")[1];
        jwt.verify(token, JWT_SECRET, (err, user)=>{
            if(user){
                req.user = user;
                next();
            } else if(err) {
                res.status(403).json("Invalid Token!");
            }
        })

    } else {
        return res.status(401).json("You are not authenticated!")
    }
};

module.exports = {
    verifyToken,
};
posts.route.js file
const express = require('express');
const postRouter = express.Router();
const PostController = require("../controllers/post.controller");
const { verifyToken } = require('../middleware/verifyBearerToken');


// Create Post
postRouter.post("/", verifyToken,PostController.createBlog);

// Get Post by ID
postRouter.get("/:id", verifyToken, PostController.getAllBlogs);

// Get All Posts or Search by Title, author or tag
postRouter.get("/", PostController.getAllBlogs);

// Update A Post
postRouter.put("/:id",verifyToken, PostController.updateBlog);

// Delete A Post
postRouter.delete("/:id", verifyToken, PostController.deleteBlog);

// user route
postRouter.route('/userblogs', PostController.userBlogs);


module.exports = postRouter
Performing CRUD
Let's login with the data provided earlier, using the PostMan.
{
    "username": "Thinktwice72",
    "password": "Thinktwice1234"
}
Before performing any CRUD operation, let's ensure to copy the accessToken generated during login , and paste it in the Headers token, attached to the Bearer word separated with a space. Note that accessToken gets expired one(1) hour after the user logs in. This means the user gets logged out of the account automatically. Users would be required to log in again to have access.
See the image below:

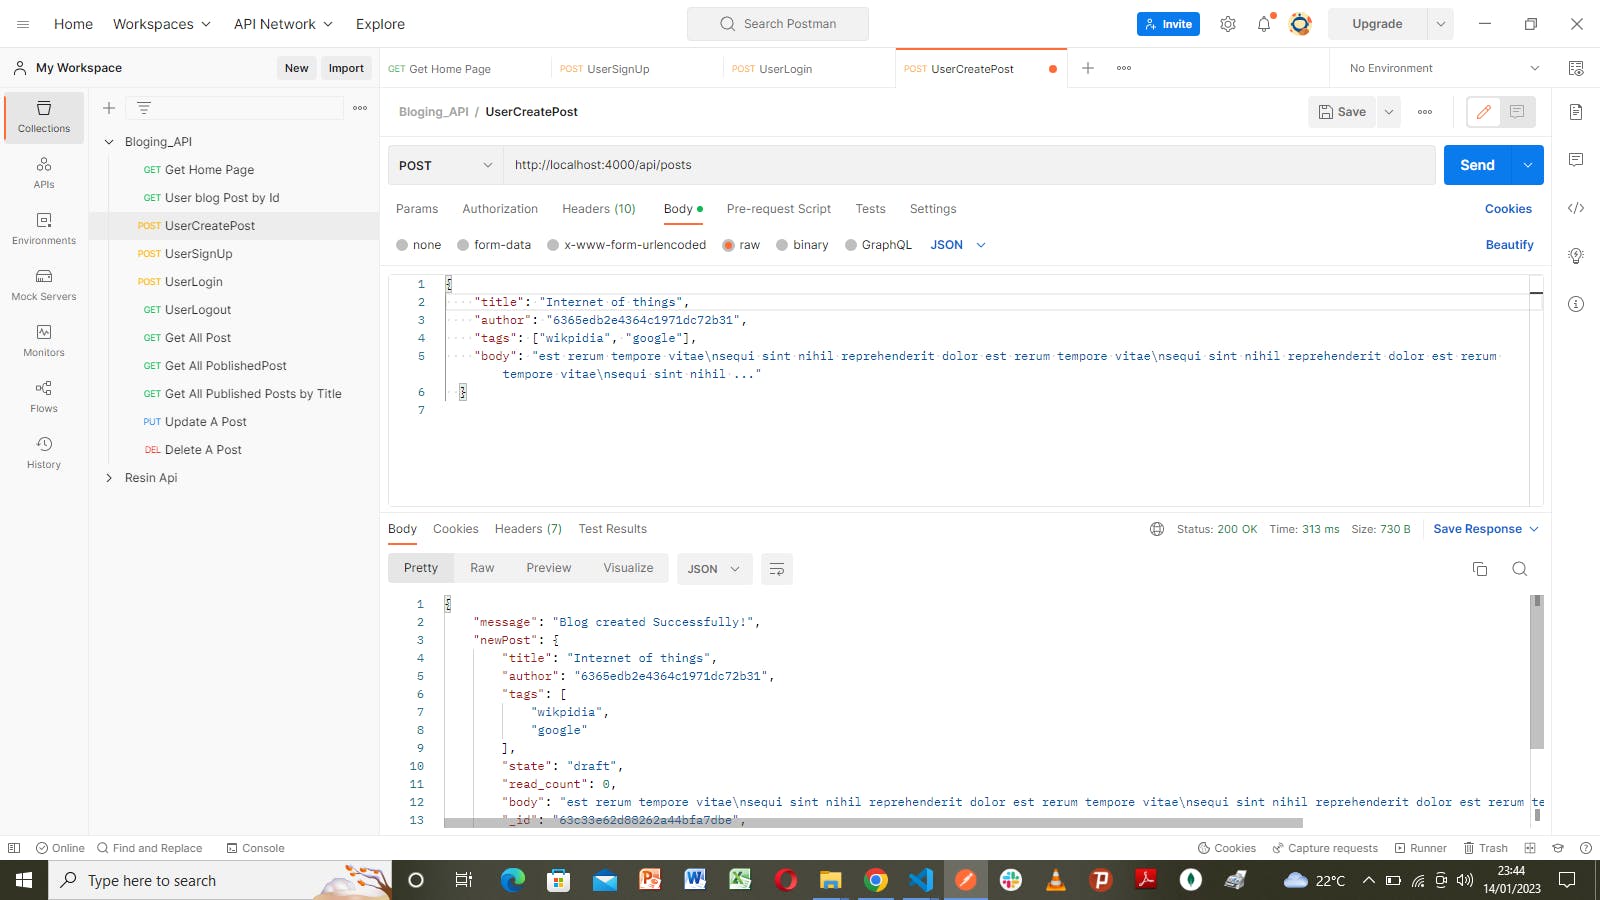
Create a post
Method - POST
Route- localhost:4000/api/posts
In PostMan, under the Body , select Json , paste the data below
{
    "title": "Internet of things",
    "description":"Lorem ipsum dolor sit amet, consectetur adipiscing elit, sed do eiusmod tempor incididunt ut labore et dolore magna aliqua. Ut enim ad minim veniam, quis nostrud exercitation ullamco laboris nisi ut aliquip ex ea",
    "author": "AGA2Gambo1",
    "tags": ["wikpidia", "google"],
    "body": "est rerum tempore vitae\nsequi sint nihil reprehenderit dolor est rerum tempore vitae\nsequi sint nihil reprehenderit dolor est rerum tempore vitae\nsequi sint nihil ..."
  }
Get post by ID
Method: GET
Route: localhost:4000/api/posts/:id
Here, we copy the id generated when the post is created, and replace it with the :id in the route. This becomes
http://localhost:4000/api/posts/63bdc533c5bae085a4fc1394

Other Routes and their methods are shown below.
Get All Posts
Method: GET
Route: localhost:4000/api/posts
Get All Published Posts
Method: GET
Route: localhost:4000/api/publishedPosts
Get All Published Posts by Title, Author or Tag
Method: GET
Route: localhost:4000/api/publishedPosts?title=yourTitle
To search by Author or Tag, just replace the title in the Route.
Update A Post
Method: PUT
Route: localhost:4000/api/posts:id
Delete A Post
Method: DELETE
Route: localhost:4000/api/posts:id
Data Validation
Data validation serves as a form of protection that filters out invalid data sent by the user. It ensures that the data received is in the proper format. To mitigate invalid or unwanted data from the user, we can set up filters that analyze every data sent by the user during signup and creating posts. This can be done manually or by using a validation library. In this article, we shall be using the joi validation library.
In the root folder, create a folder called validators . In this folder, create a file - posts.validator.js . The posts.validator.js validates posts made by the user .
Let's install the joi library.
npm i joi
posts.validator.js file
const Joi = require("joi");

const PostSchema = Joi.object({
  title: Joi.string().min(3).max(255).trim().required(),
  description: Joi.string().min(3).max(500).optional().trim(),
  tags: Joi.array().items(Joi.string()).optional(),
  state: Joi.string(),
  read_count: Joi.number(),
  reading_time: Joi.number(),
  body: Joi.string().required(),
  author: Joi.string(),
  createdAt: Joi.date().default(Date.now),
  lastUpdateAt: Joi.date().default(Date.now),
});

const postUpdateSchema = Joi.object({
  title: Joi.string().min(1).max(255).trim(),
  description: Joi.string().min(1).max(500).trim(),
  tags: Joi.array().items(Joi.string()),
  state: Joi.string(),
  read_count: Joi.number(),
  reading_time: Joi.number(),
  body: Joi.string().required(),
});

async function postValidationMiddleWare(req, res, next) {
  const postPayload = req.body;

  try {
    await PostSchema.validateAsync(postPayload);
    next();
  } catch (error) {
    next({
      message: error.details[0].message,
      status: 400,
    });
  }
}

async function updatePostValidationMiddleware(req, res, next) {
    const postPayLoad = req.body

    try {
        await postUpdateSchema.validateAsync(postPayLoad)
        next()
    } catch (error) {
        next({
            message: error.details[0].message,
            status: 400
        })
    }
}

module.exports = {
    postValidationMiddleWare,
    updatePostValidationMiddleware,
}
In the code above, we see that postValidationMiddleWare and updatePostValidationMiddleware functions are both exported. These functions will be imported in post.route.js and used as a middlewares to validate the createPost and the updatePost respectively.
post.route.js
const express = require('express');
const postRouter = express.Router();
const PostController = require("../controllers/post.controller");
const { verifyToken } = require('../middleware/verifyBearerToken');
const {
    postValidationMiddleWare,
    updatePostValidationMiddleware
} = require('../validators/posts.validator')


// Create Post
postRouter.post("/", verifyToken, postValidationMiddleWare, PostController.createPost);

// Get Post by ID
postRouter.get("/:id", verifyToken, PostController.getPost);

// Get All Posts or Search by Title, author or tag
postRouter.get("/", verifyToken, PostController.getAllPosts);

// Update A Post
postRouter.put("/:id", verifyToken, updatePostValidationMiddleware, PostController.updatePost);

// Delete A Post
postRouter.delete("/:id", verifyToken, PostController.deletePost);


module.exports = postRouter
This handles invalid data.
Deployment
Deployed on Heroku. Depending on individual preferences or professional advice, other cloud-hosting platforms such as Render, cyclic, etc. can be used for deployment.
Conclusion
This article covers server creation with MongoDB integration. Users are given the privilege to create, read, update, and delete their posts.